
Monday, September 12, 2011
NEW BLOG
Hey everybody I moved to a new blog... ever since I changed my blog name the other day it hasn't been updating my posts in the dashboard. Apprarently there is no way to fix the problem except to make a new blog. So I made a new blog at http://nailartepicness.blogspot.com/ I went and posted all my nail swatches and tutorials there. So if you would please unfollow me here and follow me at the new link I would appreciate it. I am working on following everybody back that I was following before! Thanks in advance!!
Sunday, September 11, 2011
Sally Hansen: Green With Envy
Hey everyone! I decided this week that I'm going to do a full week of halloween inspired nail art. Why? Because this thursday (sept. 15th) is my 22nd birthday! And I wanted to do something fun for it. I figured since I'm itching for halloween and it's my birthday it would be appropriate for my blog. I guess a blog birthday present to myself? Corny I know lol.
This is Sally Hansens Green with Envy from the Xtreme Wear collection. I'm gonna have to be completely honest. This color reminds me of bougars. But oh what lovely bougars they are! Haha. I love the brushes on these polishes. The formula is pretty thick. I only have two coats on and a top coat. I probably could have gotten away with just one coat of this, but oh well.


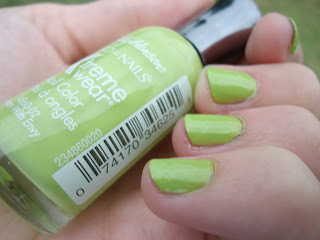


What do you think of the color? Or the collection?

This is Sally Hansens Green with Envy from the Xtreme Wear collection. I'm gonna have to be completely honest. This color reminds me of bougars. But oh what lovely bougars they are! Haha. I love the brushes on these polishes. The formula is pretty thick. I only have two coats on and a top coat. I probably could have gotten away with just one coat of this, but oh well.


P.S. Show my blog some love and follow me =]
Saturday, September 10, 2011
Sinful Colors: Mint Apple
Yay! It's saturday. I'm just waiting for this month to hurry up and get over with because at the end of the month my boyfriend, daughter and I get to move into our apartment. We are currently living at his dad's so we don't really have any privacy.. or a door, but we will soon! lol. Anyways here is a swatch from Sinful Colors. It's called Mint Apple. It's such a soft color. I'm gonna say it's turquoise? lol. It has a bit of a shimmer to it which I tried my best to capture! This is three coats and a top coat. (The dents in my nails are from acrylics that I had on a couple months ago.)


This is actually the first time I have worn this color and I believe I bought it about four or five months ago! lol. I actually really like it, but I guess I'm just not use to wearing shimmery colors. I'm trying to open up to all different types and brands of nail polish. I'm not really loyal to any certain brand, but I do love sinful colors polishes!
What about you? Is there a certain brand you will only buy from or won't buy from?
Friday, September 9, 2011
Monster Energy Drink Nail Art
So, I wanted to change my blog name. It was originially called Olivia's nail art. Olivia is my daughter's name. I wanted to be a little more creative and came up with nail polish epicness. And of course with a name change I had to change the layout. I don't really care for the one I put up, but it will have to do for now. I will mess with it later.
Anyways, it's time for a nail tutorial! I did this for my boyfriend's little step sister a few weeks ago and she loved 'em! So, I decided to re-do them on my own nails. It's the Monster Energy Drink logo. Here are the final results:

You Will Need:
A Basecoat
Black Nail Polish (with a thin brush)
Bright Green Nail Polish
Step One:
Apply a basecoat to protect your natural nail. Then apply your green nail polish. I used three coats of claire's neon green polish.
Step Two:
Draw a squiggly line like this:

Step Three:
Draw another squiggly line that looks like this:

Step Four:
Add the last squiggly line like this:

Step Five:
Add a top coat and you're done!
Hope you enjoyed this tutorial =]
Claire's: Neon Green
I was debating on what swatch I wanted to do next. I picked Claire's Neon Green Polish. I have had this nail polish for about three years now. I could tell it was old when I applied it. It was a little on the gooey side (plus the label was completely rubbed off lol). After painting my nails with it I decided it's time to say farewell to this color, but at least I got a swatch (and a nail art tutorial) out of it before I pitched it. I don't really care for Claire's nailpolish as it chips soo easily (that could explain why I only ever bought two bottles). I am wearing three coats and no top coat.


What's your take on Claire's Nail Polish?
Thursday, September 8, 2011
Wet N' Wild: Teal Of Fortune
Hey guys! I can't believe it's thursday already! Today I wanted to do a swatch from Wet N' Wild's Fast Dry polishes. It's called Teal Of Fortune. The name is quite corny if I do say so myself. I ended up having to do 3 coats of this, but on the bright side I didn't need a top coat because it was glossy all on it's own. I'm still on the edge if I like the formula or not. I flat out hate the brush though. It was very difficult to paint my nails without getting it all over. The brush reminds me of the water color paint brushes I use to use when I was a kid. I do however really like the color. It's a blue, but when you're in a darker room you can see green in it. I tried my best to capture the green, but unfortunately I couldn't.


Like I said, I really like the color and I love how you there is a green tint to it. I just wish the brushes were different. I did however get this nail polish for .99 cents so I can't complain too much lol. What about you? Do you own any of Wet N' Wild's Fast Dry polishes? If you do, do you like them or no?
Wednesday, September 7, 2011
N.Y.C.: Times Square Tangerine Creme
My boyfriend and I went to quite a few stores yesterday. And of course almost all of them had their halloween decorations and costumes out. We even went to an all halloween store. Afterwards I was feeling a bit in the halloween mood. So, I of course painted my nails orange. I used N.Y.C.'s Time Square Tangerine Creme. I really love this color. As soon as I put it on it reminded me of candy corn. Which gave me the idea to candy corn nails (a little closer to halloween) But here is the swatch for it. I used two coats and a top coat.


I'm pretty antsy for halloween after all the halloween stuff I seen setting out. I'm excited to do some halloween nail art also =] That's my favorite thing about nail polish, doing art on my nails! Even if it doesn't last very long I still love it! How about you? Are you ready for halloween?
Tuesday, September 6, 2011
N.Y.C.: Broadway Burgundy Frost
I finally have a camera thanks to my awesome boyfriend =] This is my very first nail swatch. I'm pretty cheap when it comes to buying things (I'll have to change that) I just like N.Y.C. because I can get 7 nail polishes for $7 instead of spending $7 on just 1 bottle. I will however purchase more expensive brands in the future. Anyways, here it is my first nail swatch. It's called Broadway Burgundy Frost. I took some pictures out of the sun and some in the sun. I'm wearing two coats and a top coat. The color is pretty opaque and I probably could have just done one coat, but I always like to do two just in case I miss a spot some where on my nail.


It's been a while since I have worn this color, but wearing it reminded me of how much I love it! I think it counts as a fall color? lol. I don't do the whole "what's in" thing. Do you?
Wednesday, August 31, 2011
Ways to recycle your old nail polish bottle!

1. Use it as a container to hold glitter or tiny beads.
2. Use it as a vase for flowers! Ok, I know what you're thinking. It's wayy too small to use as a vase, but that's where you're wrong! I use to be a florist and we were given small vases that we had to work with just pop in a single flower, add tiny pieces of babies breath and a small bow! A great gift for mothers day or just because!
3. Store your custom made paint in it. Did you mix colors together and have extra paint left over? Store in a nailpolish bottle!
4. Do you want to make your own nail polish, but don't want to use all of your top coat to do it? Poor half of the top coat into a recycled bottle!
5. If you have colors that you are just bored with and are half empty mix the colors together to create a new color.
6. Use it to hold your rings. You can store your rings on the brush handle.
7. If you make your own lipgloss you can use the bottle as a storage containter and the brush as an applicator. (Make sure to cut the brush down for better application.)
8. Make tiny miracas!
9. Use them as decoration. Making a chandlier or putting them in the window and watching the sun beat through them. Just get creative with it!
10. Make your own perfume! Or you can store a bit of your favorite perfume in it if you are going on an airplane as there are only certain amounts of oz you can take.
Have another great way to recycle an empty nailpolish bottle? Please share!
Monday, August 29, 2011
Make Your Own Nail Polish
 There have been times where I have looked all over to find a certain color of nail polish and didn't have any luck. If this has happened to you then maybe I can help! Below you can follow the easy steps to making your own nail polish.
What you will need:
1. Clear coat nail polish or white nail polish
2. A funnel (an envelope will work great!)
3. An eyeshadow that you aren't going to use
4. Glitter (optional)
5. Scissors
6. Small stick (toothpick)
Step 2: Snip a very small piece of the corner of the envelope off. Place the snipped off area over top of the clear coat (or white) nailpolish bottle. Then poor the eyeshadow into the envelope. If you would like to add glitter you can!
Step 3: Stir the nailpolish up well with the toothpick. Close the bottle and shake it.
Step 4: Try it out. If you aren't satisfied with the color add more eyeshadow/glitter.
Subscribe to:
Posts (Atom)